
Take table orders
Open a table, add dishes, send the KOT to the kitchen and settle the bill. Pickup and delivery orders work the same way.
Before you start
- Add your menu.
- Set up your dining areas and tables. See Set up your tables below.
Take an order
Click POS under Sales channel. The Table View shows every table, grouped by dining area.
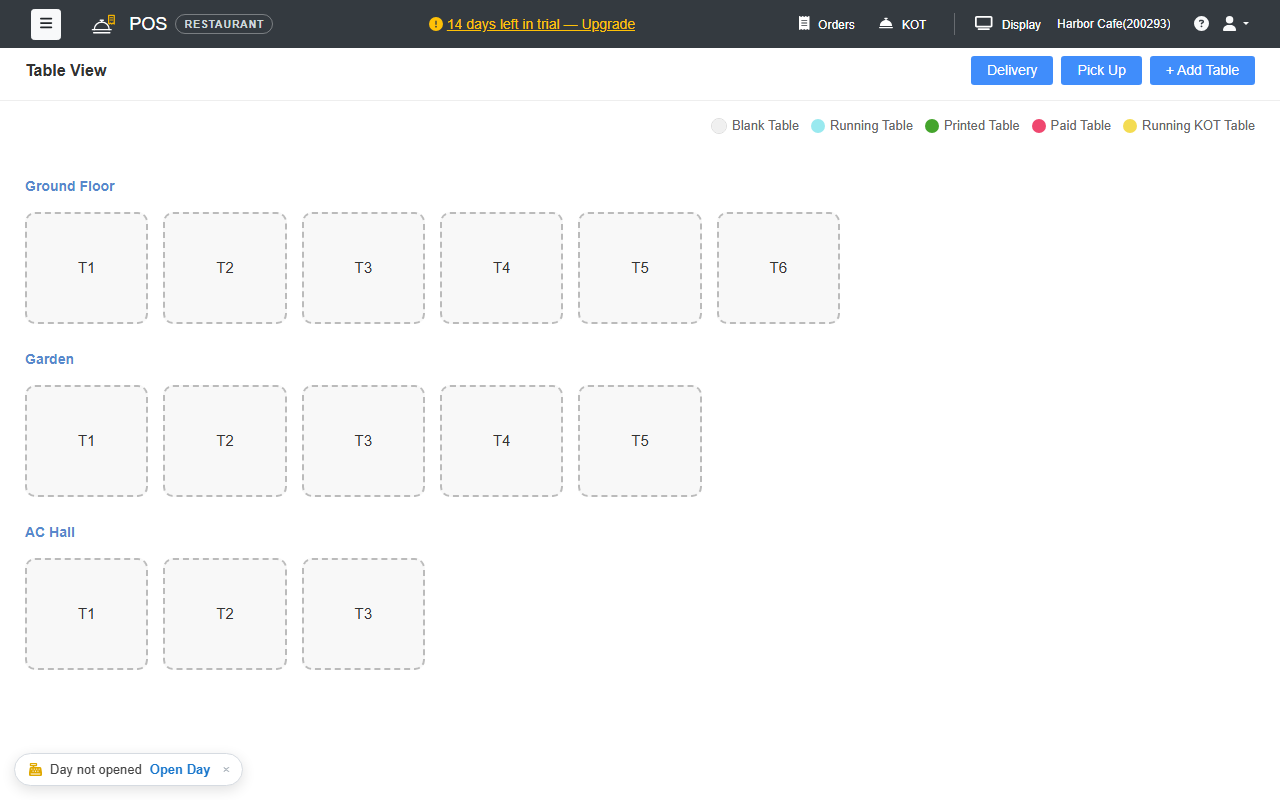
- Click a free table. The order screen opens with the table at the top of the order panel.
Tap dishes to add them, or use Search Item or Short Code. Change quantities with - and +.
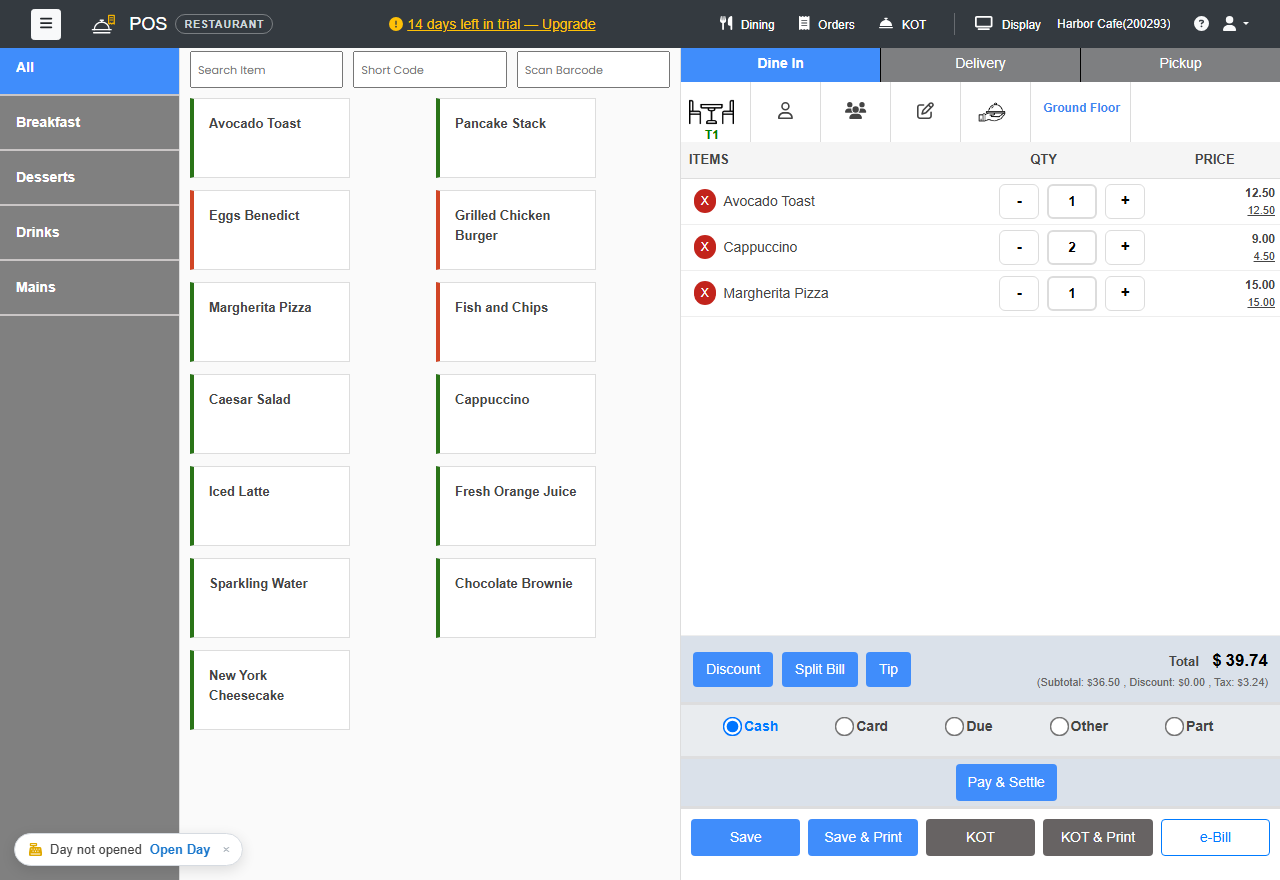
Optional, using the icons above the items:
- Customer: add the guest's name and number.
- Guests: the number of people at the table. This feeds the Head Count report.
- Note: for example no onions.
- Waiter: who is serving the table.
- Click KOT to send the order to the kitchen, or KOT & Print to also print the kitchen ticket.
The table turns yellow (Running KOT Table) in the Table View.
Add more items later
Open the table again, add the new dishes and click KOT. Only the new items go to the kitchen, and the bill keeps everything. If you remove an item that was already sent, the kitchen gets a cancellation slip.
Move or merge tables
When guests change tables, or two groups join up, open the table and click Table next to the order total. On a tablet or phone, it's under Actions › Table: Move / Merge.
| Option | What it does |
|---|---|
| Move Table | Moves the whole order to a free table. The old table is free again. |
| Move Items | Moves some items to another table: tick the items, then choose the table. A free table gets a new bill. At least one item must stay; to move everything, use Move Table. |
| Merge Table | Brings another table's order into this bill. The other table is free again. |
Choose the table, check the message and click Confirm.
- The kitchen: nothing is cooked twice or cancelled. If a KOT is still being prepared, a slip with the new table and MOVED FROM the old one prints at the kitchen, and the Kitchen Display shows the new table. You can turn the slip off in Billing settings.
- Same dish on both tables: if a moved item is already on the other table, the two lines become one, for example Pepsi 4 and Pepsi 1 become Pepsi 5. Items with a different note, price or add-ons stay on their own lines.
- The merged bill: the bill that was brought in is closed as Cancelled with the reason Merged into Bill #... and a zero amount, so every bill number is still accounted for.
Save the order first. The Table option asks you to save if the order has unsaved changes. If the bill was already printed, print it again after a move or merge.
You can't move or merge a bill that already has a payment. To merge, the bill being brought in can't have its own discount or tip: remove them first, then add them to the merged bill.
Settle the bill
- Open the table and click Save & Print to print the bill for the guests. The table turns green (Printed Table).
- When they pay, choose the payment type and click Pay & Settle, then Finalize & Settle. See Payments and discounts.
The table is free again for the next guests.
Table colours
| Colour | Means |
|---|---|
| Grey outline | Blank Table: free |
| Light blue | Running Table: order saved, not yet sent to the kitchen |
| Yellow | Running KOT Table: KOT sent |
| Green | Printed Table: bill printed |
| Red | Paid Table: paid |
| Purple | Reserved: a booking is coming up. See Table reservations. |
Pickup and delivery
On the Table View, click Pick Up or Delivery at the top right. You can also switch the order type with Dine In / Delivery / Pickup on the order panel. The rest is the same as a table order.
Set up your tables
New businesses start with a few sample dining areas and tables. To match your floor:
- Go to Restaurant › Dining Areas to rename, add or remove areas, such as Ground Floor, Garden or Bar.
- Go to Restaurant › Dining Tables to add tables. Give each one a Table Name / Number, assign it to a dining area and set its Capacity (Seats).
You can also add a table from the Table View with + Add Table.
To charge different prices in different areas, or for pickup and delivery, see Area and order-type prices.
Waiters
Add your waiters under Restaurant › Waiters, with their name and mobile number. They don't need a sign-in. You pick them on the order.
If a waiter also takes orders on a phone or tablet, invite them as a Captain and link their login to their waiter name. Tables they open then get their name as the waiter automatically. See Captains.
Related
- Table reservations and waitlist: book tables, take bookings online and seat guests in one tap.
- KOT stations: send each category's KOT to its own kitchen printer.
- Kitchen Display
- Split the bill: equal shares, or by item so each guest pays for what they had.