
Connect Shopify
Bring Shopify orders into Ellibo as invoices with their payments, add new customers, match products by SKU and send your Ellibo stock levels back to Shopify - with the 2026 Shopify app setup, step by step.
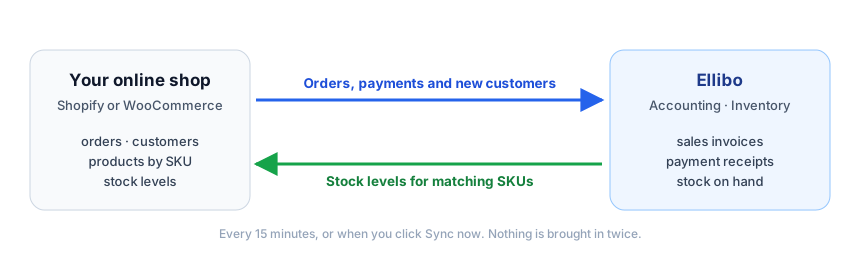
With Shopify connected:
- Orders come in as sales invoices every 15 minutes (or when you click Sync now), with the payment when the order is paid.
- New customers are added - an existing customer with the same email is reused.
- Products are matched by SKU. An order line whose SKU matches an Ellibo item is linked to that item, so it counts in your item sales and stock.
- Stock goes back to Shopify: for items with a SKU and stock tracking, Ellibo sends the quantity on hand to Shopify.
Before you start
- You must be the Shopify store owner, or a staff member with the App developer permission.
- Use the same SKU for a product in Shopify and its item in Ellibo. Orders still come in without one, but the line isn't linked to an item and stock isn't sent back.
- Your shop should sell in the same currency as your Ellibo books. Orders in another currency are skipped and listed in Recent activity for you to add by hand.
Step 1: Create an app for Ellibo in Shopify
Since 1 January 2026, Shopify creates custom apps in its Dev Dashboard. It takes about five minutes.
- In your Shopify admin, go to Settings › Apps › Develop apps.
- Click Build apps in Dev Dashboard.
- Click Create app and name it Ellibo.
In the app's version settings, under Access › Scopes, add these four:
read_ordersread_productsread_inventorywrite_inventory
- Leave the other settings as they are (Ellibo isn't an embedded app). Click Release, then Release again.
- Open the app's Installs section, click Install app, choose your store, and click Install.
- Open the app's Settings and copy the Client ID and the Client secret.
If you made a custom app in the Shopify admin before 1 January 2026, it still works. Paste its Admin API access token (starts with shpat_) in the last box instead of a Client ID and secret.
Step 2: Connect in Ellibo
- Open Settings › Integrations › Connected apps.
- On Shopify, click Connect Shopify to open the form.
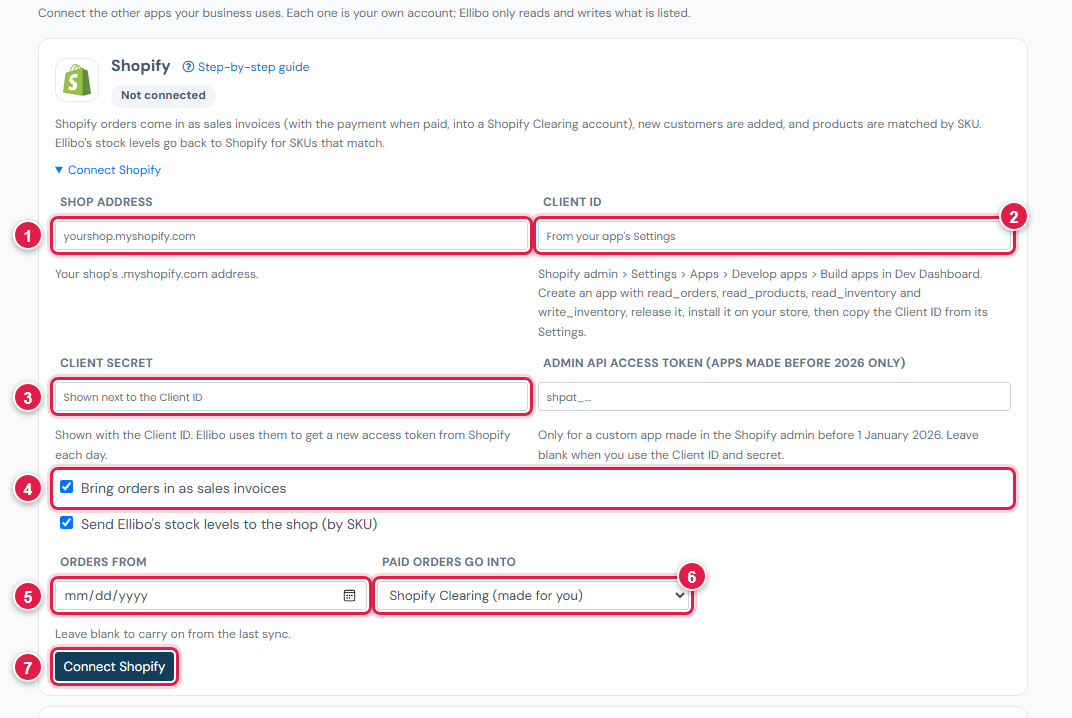
| # | Field | What to enter |
|---|---|---|
| 1 | Shop address | yourshop.myshopify.com - your Shopify address, not your own domain |
| 2 | Client ID | From the app's Settings |
| 3 | Client secret | From the app's Settings |
| 4 | Bring orders in as sales invoices / Send Ellibo's stock levels to the shop | Keep both ticked, or untick what you don't want |
| 5 | Orders from | The first day to bring orders in. Older orders are left out |
| 6 | Paid orders go into | Keep Shopify Clearing (made for you), or pick a bank account |
| 7 | Connect Shopify | Click it |
Ellibo checks the app with Shopify and shows Shopify is connected (your shop name).
Step 3: Check the first sync
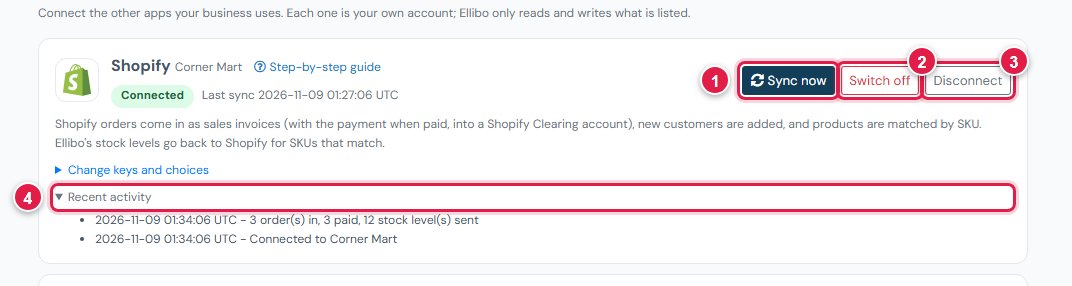
- Click Sync now.
- Open Recent activity under Shopify. It says how many orders came in, how many were paid, how many were skipped, and how many stock levels were sent.
- In Accounting or Inventory, open Sales: each Shopify order is an invoice with the reference Shopify #1001.
How orders come into your books
| In Shopify | In Ellibo |
|---|---|
| A new order | A sales invoice dated the order date, reference Shopify #order, lines at the shop's prices and tax, with shipping as its own line |
| The order is paid | A payment receipt into Shopify Clearing, marked Paid in Shopify (gateway) |
| A cancelled order | Skipped |
| An order changed after it came in | Not changed again in Ellibo - edit the invoice if needed |
| A customer | Found by email, or added as a new customer |
If an order's total in Ellibo differs from Shopify's by more than 1, Recent activity shows it so you can check the taxes.
When Shopify pays out, record the payout from Shopify Clearing to your bank with a transfer or journal in Accounting, with the Shopify fee as an expense.
How stock goes back
- Every sync, Ellibo sends the quantity on hand of each item with a SKU and stock tracking, to your Shopify location, if it changed since the last sync.
- Up to 200 levels per sync. A big catalogue catches up over a few syncs.
- Ellibo's quantity replaces Shopify's. Keep stock in Ellibo, and don't edit quantities in Shopify for those SKUs.
Good to know
- Shopify lets apps read the last 60 days of orders. Set Orders from within that time.
- Switch off pauses everything; Switch on carries on from where it stopped.
- Disconnect removes the keys. Invoices and customers already brought in stay. To also stop Shopify, uninstall the app in Shopify.
If something goes wrong
| Problem | Fix |
|---|---|
| Enter your shop as yourshop.myshopify.com | Use the .myshopify.com address (Shopify admin › Settings › Domains). |
| Shopify did not accept this Client ID and secret | Check the app is released and installed on this store, and copy the secret again. |
| Shopify did not allow access | One of the four scopes is missing. Add it, release a new version, and install again. |
| Orders skipped: is in USD (books are in …) | The order is in another currency. Add it by hand in Accounting. |
| Stock not changing in Shopify | The SKU must match exactly, and the item must track stock. Check Recent activity for messages. |
| No Shopify location to set stock in | Your Shopify store needs at least one active location. |