
Connect Stripe
Take cards, Apple Pay, Google Pay, Link and local payment methods through your own Stripe account - secret key, webhook, test cards and going live. Also powers automatic subscription payments.
Stripe lets customers pay by card, Apple Pay, Google Pay, Link and local methods in 45+ countries, in most currencies. It works for invoices from every Ellibo app, POS bills and bookings, and for automatic subscription payments by card.
Before you start
- A Stripe account. Sign up at stripe.com. Test keys work straight away; to take real money, finish activating your account (business details and a bank account).
- You must be an admin of the business in Ellibo.
Step 1: Get your secret key
- Sign in to the Stripe Dashboard.
- Open API keys (search for it, or go to Developers › API keys).
- Use the Test mode / sandbox switch to choose test or live keys.
- Copy the Secret key - it starts with
sk_test_orsk_live_. Don't use the Publishable key (pk_…).
Stripe recommends restricted keys (rk_…). Create one with Checkout Sessions: Write and Charges: Write (for refunds), and paste it instead of the secret key.
Stripe shows a new live secret key only once. Copy it before you close the window.
Step 2: Connect in Ellibo
- Open Settings › Integrations › Payments.
- On the Stripe tile, click Connect.
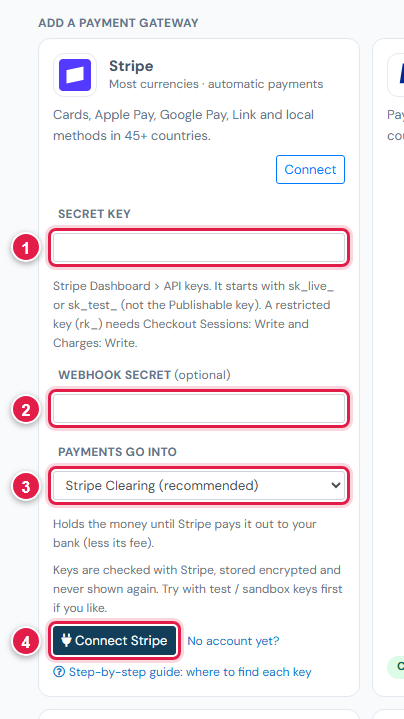
| # | Field | What to enter |
|---|---|---|
| 1 | Secret key | sk_test_…, sk_live_… or a restricted rk_… key |
| 2 | Webhook secret (optional) | Leave blank now - you add it in step 3 |
| 3 | Payments go into | Keep Stripe Clearing (recommended) |
| 4 | Connect Stripe | Click it |
Ellibo works out test or live from the key, and shows your Stripe account name.
Step 3: Add the webhook
- In Ellibo, under Your gateways › Stripe, click Copy next to Webhook URL.
- In the Stripe Dashboard (same mode as your key), open Workbench › Webhooks and click Create new destination (older dashboards: Developers › Webhooks › Add endpoint).
Choose Events on your account, and select these events:
checkout.session.completedcheckout.session.async_payment_succeededpayment_intent.succeededpayment_intent.payment_failed
- Click Continue, choose Webhook endpoint, paste the address, and create it.
- Open the new destination and reveal the Signing secret (starts with
whsec_). - In Ellibo, click Keys on Stripe, paste it into Webhook secret, and Save. The webhook shows Secret saved.
Step 4: Try a test payment
- With a test key connected, open a small invoice's Pay now link and choose Stripe.
- Pay with Stripe's test card
4242 4242 4242 4242, any future date, any CVC. (Try4000 0000 0000 3220for a card that asks for 3D Secure, or4000 0000 0000 0002for a declined card.) - Check the invoice shows Paid, then cancel the test receipt.
Step 5: Go live
- Finish activating your Stripe account.
- Switch the dashboard to live mode and copy the live secret key (or make a live restricted key).
- In Ellibo, click Keys, paste it, and Save.
- Create the webhook destination again in live mode and paste its new signing secret.
Fees, payouts and refunds
- Stripe pays out to your bank automatically, usually a couple of working days after each payment (it depends on your country). Record payouts in Accounting › Online Payments.
- Refund with the Refund button in Ellibo.
- Subscriptions can charge saved cards automatically - see Automatic payments.
If something goes wrong
| Problem | Fix |
|---|---|
| It starts with sk_live_ or sk_test_ | You pasted the Publishable key. Copy the Secret key. |
| Restricted key refused | Add Checkout Sessions: Write and Charges: Write to the key in Stripe. |
| Stripe's signing secret starts with whsec_ | Copy the Signing secret from the webhook destination, not your API key. |
| Paid but not showing | The webhook was made in the other mode, or its secret doesn't match. Check both, then click Check payment on the invoice. |
See also Fix payment problems.