
Connect Zapier
Connect Ellibo to thousands of other apps with Zapier - start a Zap when something happens in Ellibo (webhook), or create customers, items, invoices and payments in Ellibo from another app (API key).
Zapier connects apps without code. With Ellibo you can:
- Start a Zap from Ellibo - for example, when an invoice is created, add a row to Google Sheets; when a payment is received, send a thank-you email.
- Do something in Ellibo from another app - for example, when a form is filled in, create a customer; when an order comes from another shop, create an invoice.
Zapier's Webhooks by Zapier steps are on Zapier's paid plans (Professional and up), not the free plan.
When something happens in Ellibo → start a Zap
Step 1: Start the Zap
- In Zapier, click Create › Zap.
- For the trigger, choose Webhooks by Zapier, event Catch Hook, and click Continue.
- Copy the webhook URL Zapier shows (it starts with
https://hooks.zapier.com/hooks/catch/).
Step 2: Add the webhook in Ellibo
- Open Settings › Integrations › API & webhooks.
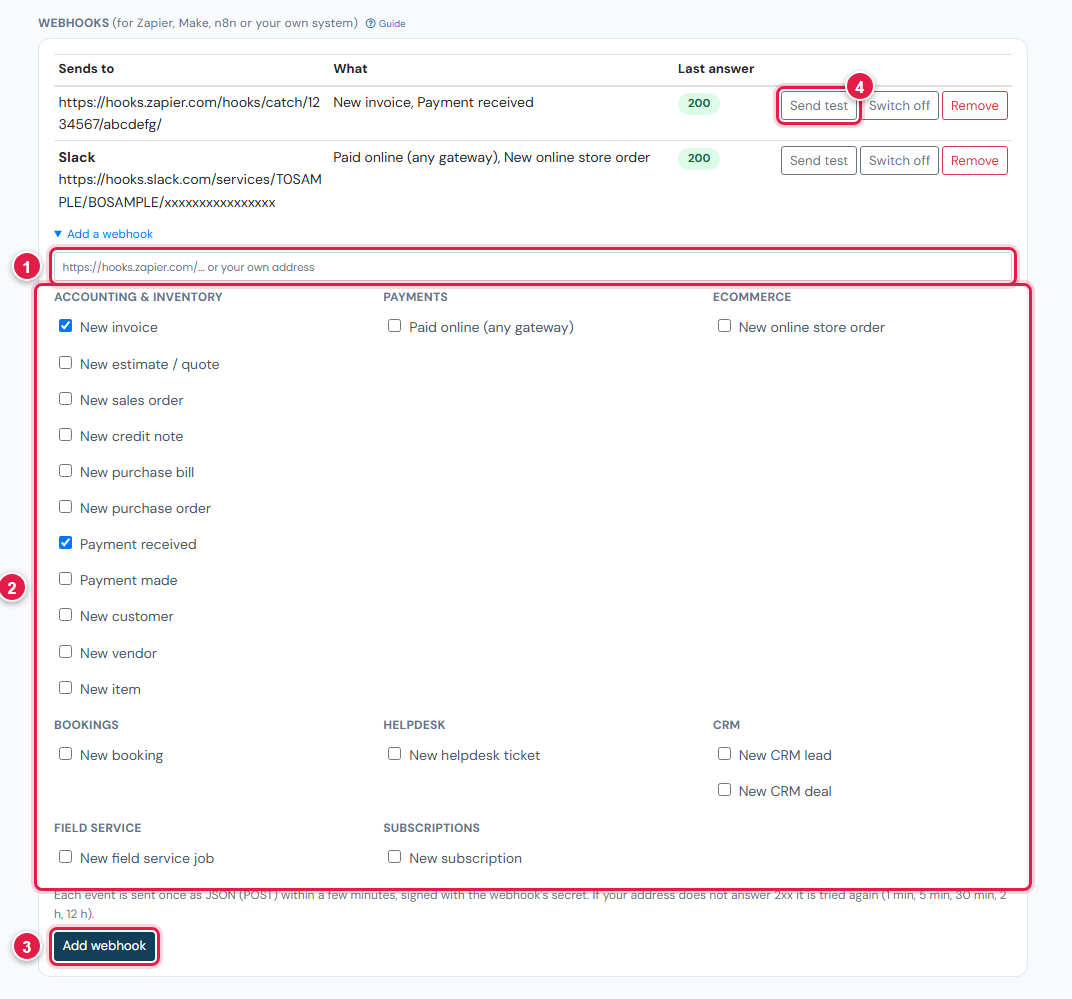
- Under Webhooks, click Add a webhook.
- Paste Zapier's URL (1), tick the events (2) - for example New invoice and Payment received - and click Add webhook (3).
- Ellibo shows a signing secret once. Zapier doesn't need it; keep it only if you check signatures elsewhere.
Step 3: Send a sample to Zapier
- Click Send test (4) on the new webhook. Ellibo sends a sample event.
- In Zapier, click Test trigger. The sample appears, with fields such as
event,summaryanddata__voucher_no. - Add your action (Google Sheets, Gmail, Slack ...) and map the fields.
- Turn the Zap on.
Real events reach Zapier within about five minutes. What each event contains: see Webhooks.
From another app → do something in Ellibo
Step 1: Make an API key
- In Settings › Integrations › API & webhooks, under Ellibo Books API, type a name such as Zapier, choose Read & write, and click Make a key.
- Copy the key (starts with
ellb_rw_). It's shown only once.
Step 2: Add a Zapier action
- In your Zap, add an action: Webhooks by Zapier, event Custom Request.
- Method:
POST. - URL: the Books API address plus what to create, for example
https://www.ellibo.com/integrations/api/v1.php/customers. - Data: the JSON body. For a customer:
{"name": "{{name from your trigger}}", "email": "{{email}}", "mobile": "{{phone}}"}- Headers:
Authorization=Bearer ellb_rw_your_key, andContent-Type=application/json. - Click Test step. Ellibo answers with the new customer, including its
id.
What you can create - customers, vendors, items, invoices and payments - and the fields for each: see API and webhooks.
Examples
| Trigger | Action |
|---|---|
| Ellibo: Payment received | Gmail: send a thank-you email |
| Ellibo: New invoice | Google Sheets: add a row |
| Ellibo: New CRM lead | Mailchimp: add a subscriber |
| Typeform: new entry | Ellibo: create a customer (POST /customers) |
| Another shop: new order | Ellibo: create an invoice (POST /invoices), then a payment (POST /payments) |
Using other Ellibo apps
CRM, Subscriptions, Projects, Helpdesk, Bookings and other apps each have their own API and webhooks (for leads, tickets, bookings and so on). They're listed under Every app's own API on the same tab, with a Keys & webhooks button for each. For CRM, see API, webhooks and Zapier.